
How to Add a Person to a Photo: 5 Easy Ways (iPhone, Android & AI)
Need to insert a missing family member into a group shot, create a memorial portrait, or paste yourself into a new background? While manual photo compositing used to require advanced design skills, modern AI and mobile shortcuts now make it possible in minutes.
This guide provides a quick, honest comparison of the best ways to add a person to a photo naturally, highlighting the latest native mobile AI shortcuts and how to achieve realistic results.
Quick Summary: What is the Best Way to Add a Person to a Photo?
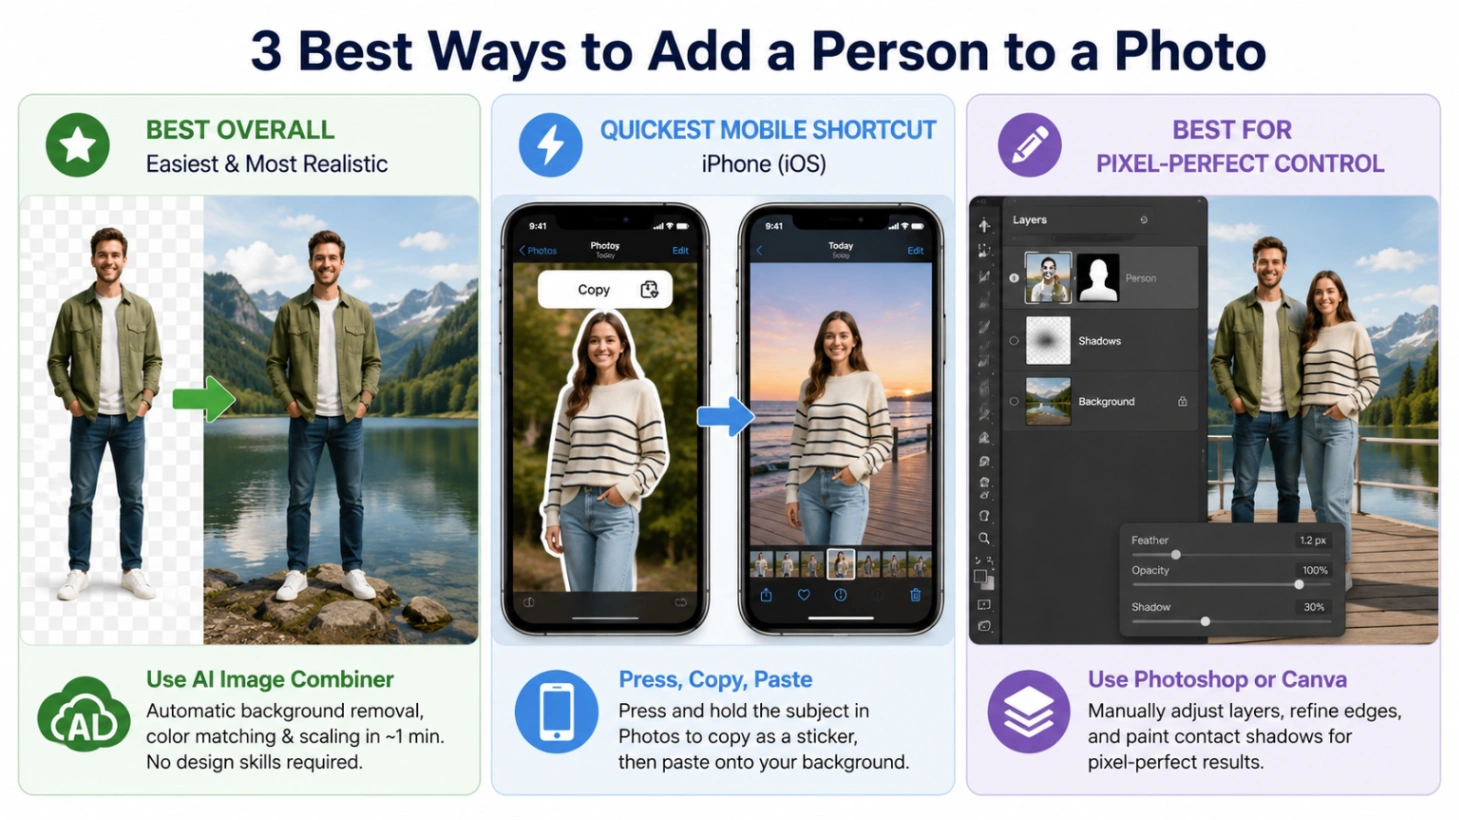
If you are in a rush, here is our quick recommendation based on hands-on testing:
- Best Overall (Easiest & Most Realistic): Use the online AI Image Combiner. It handles background removal, color grading, and scaling in 1 minute with no design skills required.
- Quickest Mobile Shortcut: Use native features like iPhone Subject Lifting or Samsung Galaxy AI to quickly overlay portraits.
- Best for Professional Control: Use Adobe Photoshop or Canva to manually adjust layers and paint contact shadows.
No credit card required · Instant Preview
💡 Quick Tip (Search Confusion): If you are trying to get Apple Photos or Google Photos to recognize a face and group them into a specific album (rather than merging two photos), that is called Face Tagging.
- On iPhone: Swipe up on the photo, tap the tiny face icon with the question mark, and select "Name This Person."
- On Google Photos: Swipe up on the photo -> People -> tap the edit pen (pencil icon) to manually assign the face to an album.
Method 1: Quick Online Photo Blending with AI Image Combiner
For a fast, hands-off solution, using a web-based AI tool is the most practical route. In our tests, the ImageCombiner AI offers a straightforward workflow that automatically matches lighting, scales proportions, and minimizes harsh edges.
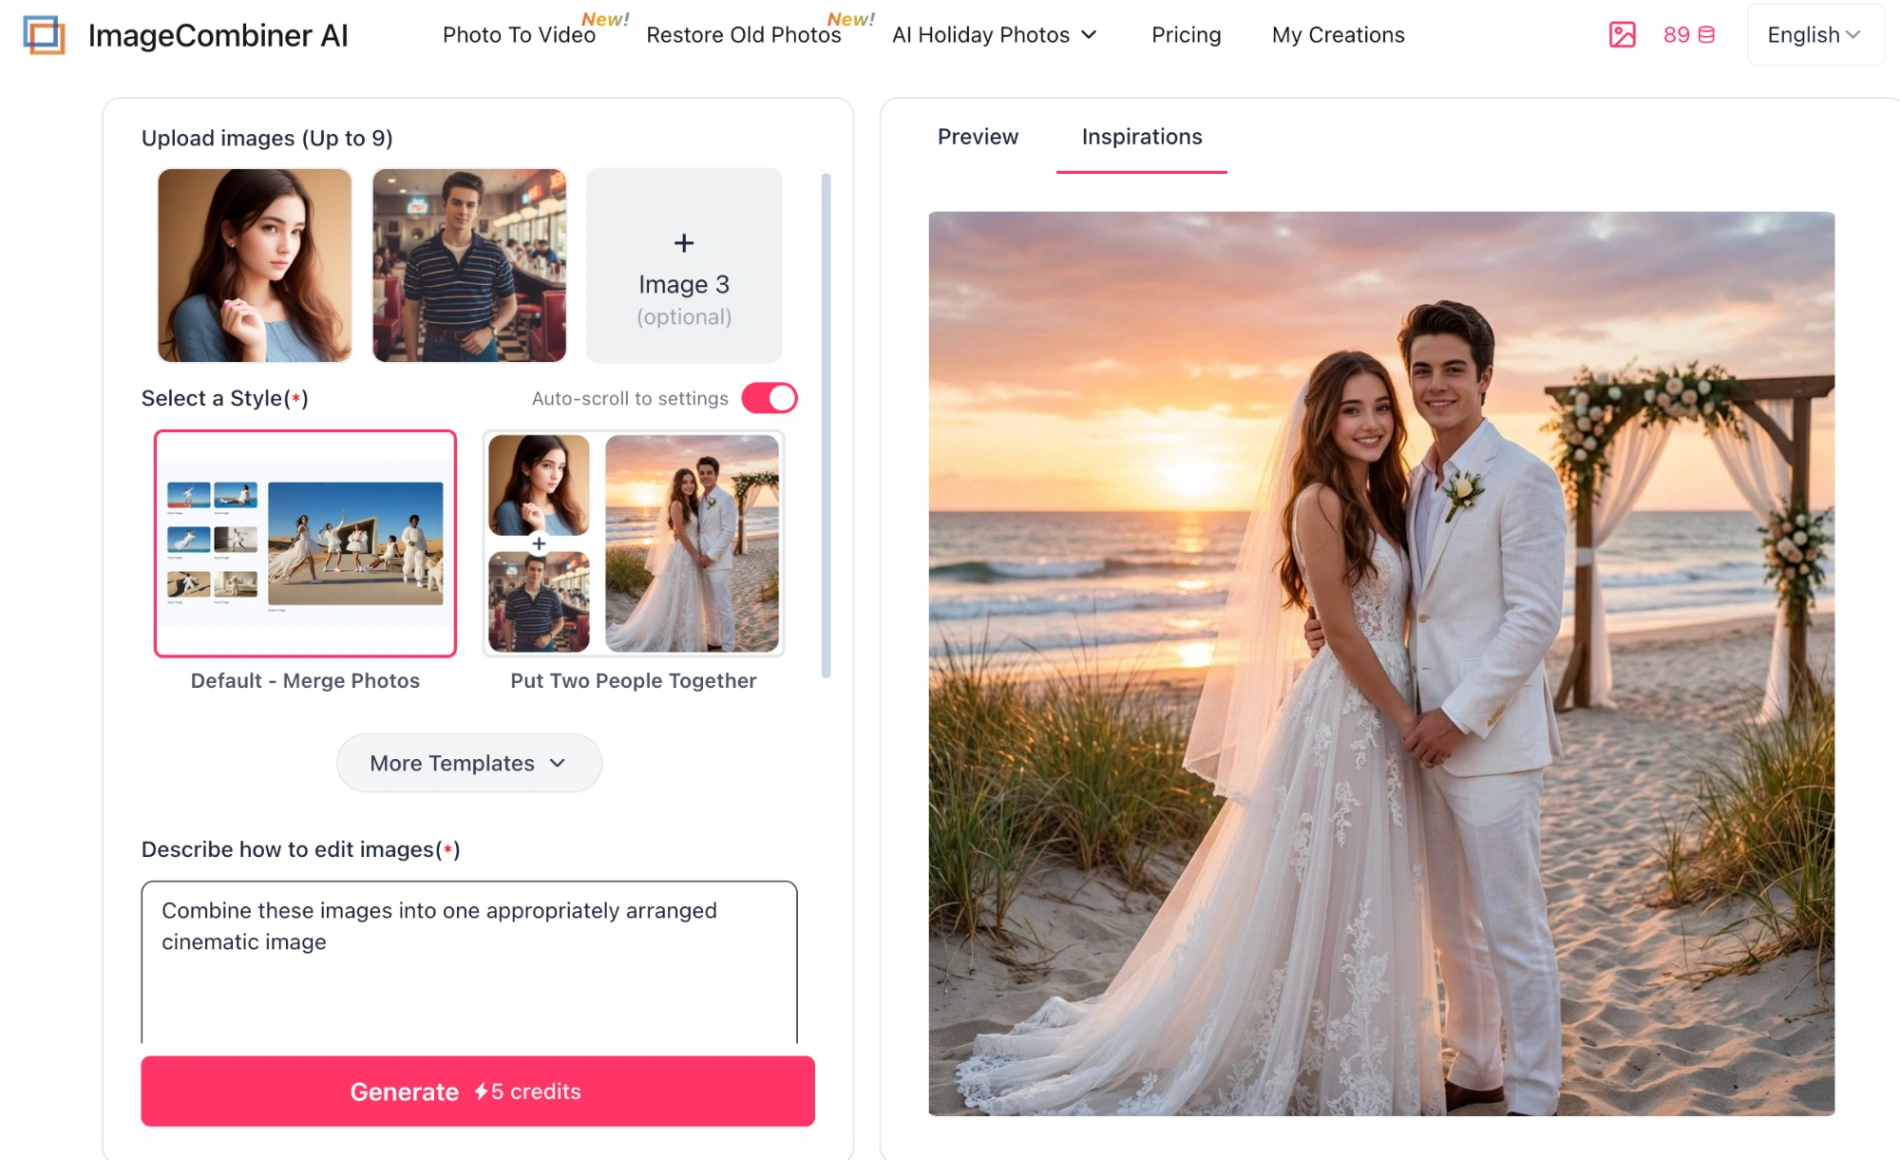
Step-by-Step Guide:
- Open the Tool: Go to the Add Person to Photo page.
- Upload Your Images: Upload your base background image and the portrait of the person you want to add.
- Position the Subject: Choose a preset template (e.g., Add Person to Photo, Insert Missing Group Member, or Respectful Memorial Tribute). You can also type a simple layout instruction (e.g., "place this person standing naturally on the far right").
- Configure Output: Select your desired Image Ratio (1:1, 16:9, etc.), Resolution (1K, 2K, or 4K), and the Output Number (1 to 4 variations).
- Generate & Download: Sign up to receive free trial credits to test the tool, preview the blended result, and download.
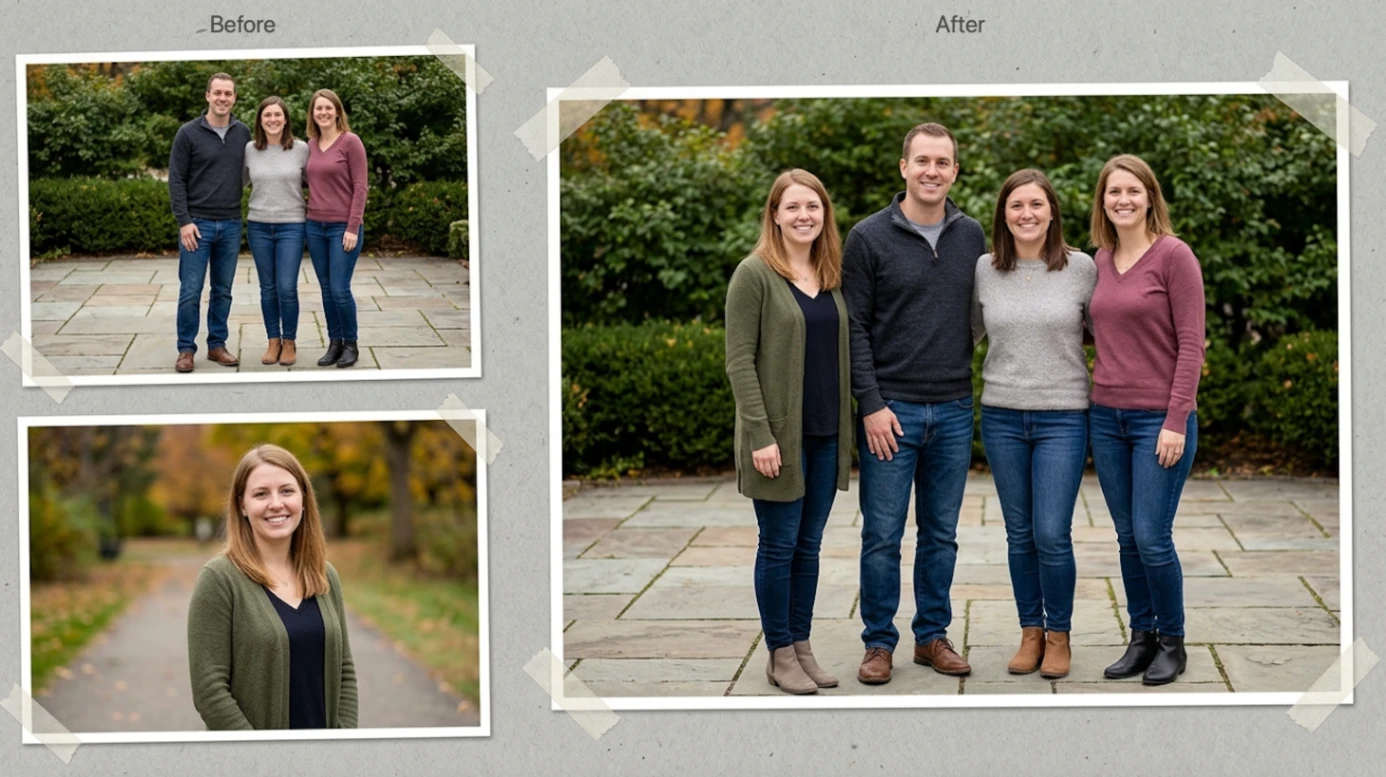
Before & After Result
Here is a real-world example of how the AI Photo Combiner can isolate a portrait, balance the lighting temperature, and blend a missing member into a family gathering:
Method 2: Native Mobile Shortcuts (iPhone & Android)
You can easily combine photos on your phone using native, built-in features. To ensure these shortcuts work on your device, check the specific version requirements and menu locations below.
On iPhone (Built-in Cut-and-Paste Method)
Requires iOS 16 or later on iPhone XR or newer.
- Extract the Person: Open the Apple Photos app and find the picture of the person you want to add. Press and hold on the subject for 1 second. You will see a glowing white outline trace the subject. Release your finger and tap Copy from the pop-up menu.
- Open the Destination Photo: Navigate to your target background photo, tap Edit (located in the top-right corner), then tap the Markup (pen tip) icon (also in the top right).
- Paste onto the Photo: Tap the + (plus) icon in the bottom-right corner of the Markup toolbar. Select Add Text. Double-tap the text box that appears, and select Paste from the menu.
- Position: Drag the corners of the box to resize the cutout and position it. Tap Done in the top-right corner to save.
On Android (Samsung Galaxy AI & Gemini)
- Samsung Galaxy AI: Requires One UI 6.1 or later (Galaxy S23, S24, S25 series, etc.).
- Open your target background photo in the Gallery app.
- Tap the Galaxy AI (three blue stars) icon in the bottom center menu.
- Tap the three dots in the top-right corner and select Add from gallery.
- Select the portrait of the person you want to add. Use your finger or an S Pen to draw a loose circle around them - the AI will automatically snap to their body shape.
- Tap Done, pinch-to-scale the cutout, drag it into place, and tap Generate (bottom center). Once satisfied, tap Save copy.
- Google Gemini AI (Any Android Device):
- Open the Gemini app or visit gemini.google.com.
- Tap the + (plus/image upload) icon in the chat bar to upload both the portrait and the group photo.
- Type this specific prompt: "Combine these two photos. Add the person from the [first] photo into the [second] photo on the right side. Automatically match the lighting, colors, and perspective."
Method 3: Canva, Photoshop, and CapCut for Layer Editing
For projects requiring absolute manual control over edges and layer positioning, dedicated design tools are your best option.
Canva (Background Remover & Magic Edit)
Note: The automatic Background Remover tool requires a Canva Pro subscription. Free users can crop photos manually or automatically process cutouts using our online photo combination tool.
- The Cutout Technique (Best for Real Photos):
- Drag your main background photo from the Uploads tab on the left sidebar onto your blank canvas.
- Drag the portrait of the person on top of it.
- Click on the portrait layer, select Edit Photo from the top toolbar, and click Background Remover (or Magic Grab).
- Drag the corners to match the scale of the scene, and click Position (top right) to adjust layer order if needed.
- The AI Technique (Magic Edit): Click on your background photo, select Edit Photo, find Magic Edit in the Magic Studio panel, brush over the area where you want the person to appear, and type a prompt (e.g., "Add a person walking on the beach").
Adobe Photoshop (Using Professional Neural Filters)
Photoshop provides professional-grade control but has a steeper learning curve. Use these keyboard shortcuts to navigate faster:
- Open your portrait photo. Press W to select the Object Selection Tool, then click Select Subject in the top options bar.
- Click Select and Mask at the top. Use the Refine Edge Brush Tool (R) to brush over hair strands, then set the Output to Layer Mask and click OK.
- Drag the masked person layer and drop it into the tab of your background photo.
- Press Ctrl+T (Windows) or Cmd+T (Mac) to open Free Transform. Hold Shift while dragging the corners to resize the person proportionally.
- Auto-Match Colors: With the person's layer selected, go to Filter > Neural Filters, turn on Harmonization, and select your background layer as the reference image. This automatically aligns skin tones and ambient light.
- Add the Grounding Shadow: Create a new empty layer directly beneath the person's layer. Use a soft black Brush (B) with opacity set to 20-30% to paint a subtle shadow underneath their feet.
CapCut Photo Editor (Overlay & Auto Cutout)
- Open CapCut Photo Editor (Web or Mobile app) and import your background image.
- Tap Overlay (bottom menu bar on mobile, or left toolbar on web) -> tap Add Overlay and choose your portrait photo.
- Select the portrait overlay layer, scroll through the bottom menu, and tap Cutout.
- Choose Auto Cutout - the AI will remove the portrait background. Pinch to scale and drag the person into position.
Pro-Tips: How to Solve 4 Common "Photoshop-Fail" Problems
Most automatic tools work best in perfect conditions. In the real world, edits often look fake because of physical discrepancies. Here is how to fix them:
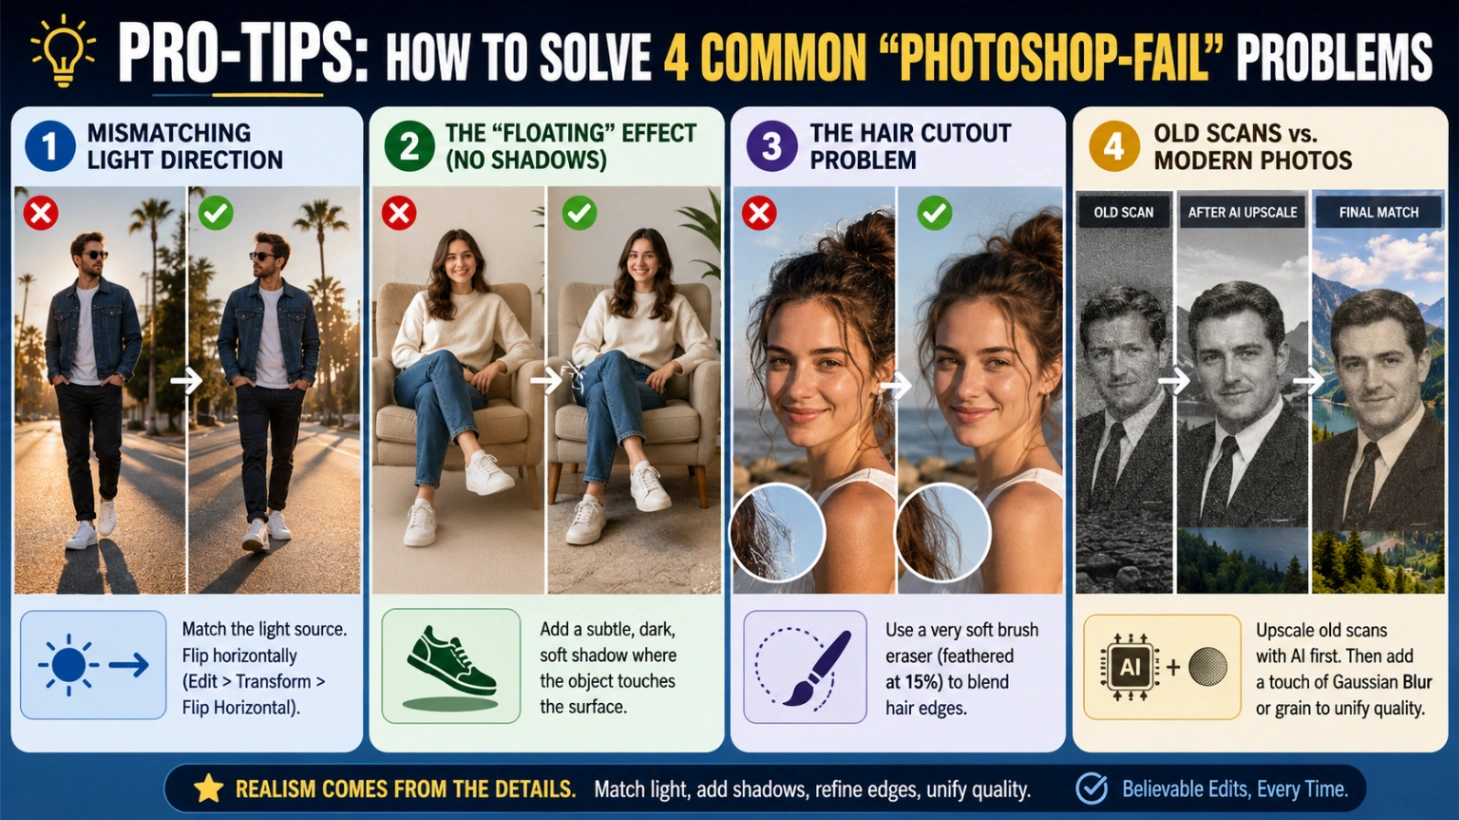
- Mismatching Light Direction: If the background shadows fall to the right, but the added person is lit from the opposite side, flip them horizontally (Edit > Transform > Flip Horizontal in Photoshop) to match the light source.
- The "Floating" Effect (No Shadows): Every object casts a shadow. Always paint a subtle, dark, soft shadow directly beneath the shoes or where the person contacts a chair. Without this "contact shadow," they will look like they are floating.
- The Hair Cutout Problem: AI background removers often struggle with fine hair, leaving blocky edges. Apply a very soft brush eraser (feathered at 15%) around the hair edges to blend the original background bleed into the new scenery.
- Old Scans vs. Modern Photos (Memorial Portraits): Placing a grainy 1990s scan of a deceased relative into a sharp 2026 smartphone photo looks disjointed. The Fix: Run the old scan through an AI upscaler first. If it's still inconsistent, apply a tiny bit of "Gaussian Blur" or digital grain to the modern background photo to unify the quality.
Method Comparison at a Glance
| Method | Ease of Use | Processing Time | Blending Realism | Best For |
|---|---|---|---|---|
| AI Image Combiner | ★★★★★ (Extremely Easy) | ~1 Minute | High (Auto color & light matching) | Quick, realistic web composites without complex manual editing |
| iOS Native Stickers | ★★★★☆ (Easy) | ~2 Minute | Low (Hard cutout edges; low-res export) | Casual, rapid sharing on mobile devices |
| Canva / CapCut | ★★★☆☆ (Moderate) | ~5 Minutes | Medium (Relies entirely on manual slider adjustments) | Basic mobile layout control with manual effort |
| Adobe Photoshop | ★☆☆☆☆ (Hard) | 15+ Minutes | Professional (Exceptional via auto-harmonization filters) | High-end commercial edits and complex composites |
Free trial credits on signup · No design skills needed
Frequently Asked Questions
Q1: Can I combine two separate photos of individuals into a realistic couple portrait?
Yes, you can easily create a romantic portrait even if you don't have an existing photo together. By using our advanced AI Couple Photo Maker, you can upload individual photos of yourself and your partner. The tool will automatically combine both subjects, match their lighting and proportions, and place them naturally into a shared romantic setting, saving you the time and expense of an actual photoshoot.
Q2: Can I combine two separate people into a single new background?
Yes. Use the Put Two People Together feature, which is powered by our AI Image Blender engine. It extracts both subjects and places them together while ensuring their proportions and lighting remain consistent.
Q3: Can I add a person to a photo online for free?
Yes. When you sign up for the AI Photo Merger, you receive free trial credits to experience the tool. For high-volume projects, advanced models, and ultra-HD outputs (up to 4K), we offer affordable premium plans.
Q4: How can I naturally add a deceased loved one to a family photo?
Creating a memorial photo requires extra care to ensure it looks respectful and warm. We suggest using our Add Deceased Loved One to Photo tool or the AI Family Portrait Generator. Both tools are designed to handle sensitive edits, allowing you to seamlessly reunite multiple generations in a single cohesive portrait. For the best result, select a high-resolution, front-facing portrait of your loved one.